Double And Triple Solar Power For Free With This Simple Method
Double And Triple Solar Power For Free With This Simple Method
In this article and the video that goes with it I will show you a simple way to get 200 to 300%, or more, extra power from your off grid solar power system for free. What I am about to show you is simple, basic electronics. The only thing that is surprising is that this is not taught in school.
I am going to start out with a very basic experiment in this article and then move on to bigger and better experiments over the next few days. The experiments shown here can be performed with any rechargeable battery including AA, AAA, C, D, 6 volt, 9 volt, 12 volt lead acid and also lithium ion batteries.
This first project is so simple that grade school children could do it. Although I am not advising anyone to copy anything I show here. Neither do I suggest that anyone without the proper knowledge or supervision copy these experiments. Experimenting with electricity and batteries can be dangerous.

Basic Battery And Light Circuit
Basic Lamp And Battery Circuit
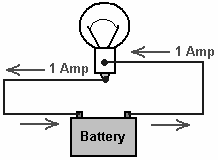
If you look at the image above you can see a basic circuit with a battery and a light bulb. We have all been taught in school that electrons flow through a wire when you connect a battery to a load. When you close the circuit between a light bulb and a battery, the bulb will light up and the battery will be discharged.
This is all very basic electronics that everyone should know and understand. We also know that energy cannot be created or destroyed but only changed from one form to another. We also know that electrons are what move through a wire when we connect a circuit. And most of us also know that electrons are not used up in a circuit. They flow from one side to another through the loop unchanged.
When you connect an amp meter to the circuit you can see that the same amount of current that flows out of the battery can also be measured coming out of the light bulb. The same. This is a very interesting point.

Charging A Battery For Free
Getting More Energy For Free
When you look at the circuit diagram above you will see something unique. This is not common knowledge and it is doubtful that you have seen anything like this in shool. There is another battery in the circuit. On the right side you can see the same battery and light bulb as before. But this time we have added in another battery on the left side. The second set of batteries can be charged up by the same electrons that are already flowing through the circuit.
Since electrons are not consumed in a circuit and since the current in a circuit is the same at all points in the circuit, we can see that those same electrons can be led into another battery which will be charged.
At this point let us consider what is going on inside a battery for a moment. When we apply an electrical current to a battery there is a chemical change inside the battery and it becomes charged up. When we connect a load such as our light bulb another chemical change occurs inside the battery and eventually the battery becomes discharged.
When we consider the circuit above with another battery, and how a battery is charged and discharged, we should not be surprised that as the electrons flow through the wires, the second battery becomes charged along the way.
Here is where I will pause a moment because some people will be having fits and some may even smash their monitors in frustration. Some people will shout and rant that such things are not possible. But this is simply basic electronics.

Venting Frustrations In Unbelief
My Experimental Example
For today's first example I am using some 18650 Lithium Ion batteries which are rated at 3.7 volts. These batteries have a normal range of between 4.2 Volts charged to 2.7 or 3 Volts discharged. For my tests I am considering 4.0 Volts to be charged and 3.0 Volts to be discharged in order to speed up the process.

Four Battery Switch Circuit
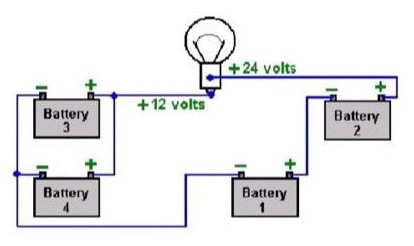
If you refer to the circuit above you can see how to set up the experiment. The example shows 12 Volt lead acid batteries being used but again I am using 18650s for my test. You can use any rechargeable battery as explained earlier.
The key to this circuit working is that the batteries powering the load must have a higher voltage than the batteries being charged. The potential difference between the two sets of batteries is what the load sees. In the circuit shown above the light bulb (load) sees 12 volts. 24 Volts - 12 Volts = 12 Volts which is the potential difference between the two battery sets. This part is very important to understand in operating this circuit. And later we will also see that this presents some issues that we have to overcome.
In the video linked at the bottom of this article you can watch the full demonstration.

Four Battery Switch Circuit Demonstration
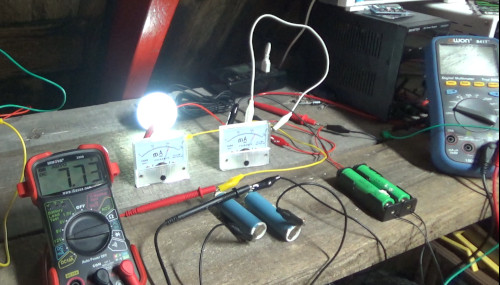
For my test I set up two batteries in series to get 8 Volts. These are considered charged. I then set up two batteries in parallel at 3 Volts. These are considered discharged. Refer to the image above.
I used a 5 Volt LED lamp as the load. The difference between 8 Volts and 3 Volts is 5 Volts. So the load (lamp) will see 5 Volts and will light up brightly. While the primary set of batteries discharges and powers the load, the second set of batteries is being charged. The meters in the video show this to be working nicely.
I will get into more details in the next article and video but note that the difference between the battery voltages is 5 Volts. This is what the LED lamp sees. But since the voltages will be changing as one set gets discharged and the other gets charged, the load will see a varying voltage. This presents a problem which I will cover later.
In my demonstration I also added two Amp meters to show that the exact same current leaving the batteries and powering the load is entering the second set of batteries and charging them. There is nothing lost in the system. The only loss will be inside the batteries themselves since electrons are not used up in a circuit.
When you watch the video you can see that indeed the batteries powering the load are being discharged as would be expected. But the surprising thing is that the second set of batteries is being charged up at the same time. Why do we not see this in the school text books? I don't know. But it works. It simply works. There is nothing magic here and no laws of thermodynamics or electronics are being violated. This is simple basic electronics at work.
Why Have We Never Heard Of This Before
This is nothing new to the World. In fact this idea is over 100 years old. The first person who experimented with this idea is Carlos Benitos over 100 years ago. But for some reason this is known as the Tesla 4 Battery Switch. You can look it up. It is all over the internet and YT.
Now before you go running off and get ahead of me to start putting together the Tesla Switch, I must warn you that there are some known flaws with that system and our modern batteries.
If you construct the system as shown in the common circuit diagrams, you will damage your batteries. This is a known fact. Back 100 year ago they built it much different than what we are shown today. They had different battery chemistry and different electronics components than we have today. They also often used capacitors in the circuits. But this gets very complicated and gets ahead of ourselves.
For now please follow along and I will show you how to make this work for yourself without damaging your batteries.
How To Use This New Found Energy
I will be getting ahead of myself here but I will explain now what is going on in the circuit again briefly and then show how you can use this energy.
The first set of batteries is powering the load (light bulb) while discharging. This part we all know and understand. The second set of batteries is now being charged up with the same current that is powering the load.
We can let this circuit run until the first set of batteries has become fully discharged. At this point we would normally shut off the light, remove the batteries and recharge them so we can use them again. But in our modified circuit we now have another set of batteries that are charged and ready to use.
All we have to do now is swap the batteries around and continue to run the load which can be just about anything. I will show some more ideas later in future videos and articles.
We can swap the batteries around a few times. You should be able to run your load for at least two times longer than before. Depending on your batteries and loss in the wires you may be able to run it much longer by swapping batteries around.
How Much Energy Can We Get
This is not perpetual motion and it does not defy any laws of electronics or thermaldynamics.
With each cycle of swapping batteries around we will have less and less usable energy in the batteries. Eventually both sets of batteries will become discharged and we will have to shut down the load and recharge one set of batteries to continue as before. But this depends on the batteries themselves and how much energy is lost in the wires and the batteries.
Battery chemistry is not perfect and there are losses inside the batteries. When we charge a battery, some of that energy is lost as heat inside the battery. Batteries also have a little bit of a self discharge inside them over time. And when we discharge a battery to power a load we do not get 100% of the energy back that we put into the battery.
Some batteries are more efficient than others. Lithium Ion batteries are better than lead acid batteries for example. And even in the same type of battery there are differences based on the age of the batteries. Older batteries will lose more energy internally than new ones.
When both sets of batteries are discharged then you simply have to recharge one set. Do not recharge both sets because one set must start out discharged in order to charge back up in the circuit. If you start out with two charged sets of batteries you may damage the ones being charged using this circuit.
Limitations And Problems With This Circuit
I am getting a little bit ahead of myself here but there are some limitations and some problems you will find when using this circuit. I will explain this in more detail in the next article and video.
The load sees the difference between the two sets of batteries. In my example the load starts out seeing 5 Volts and the LED runs fine. But as the first set of batteries discharges and the second set charges, the difference between the two sets reduces. This reduces the voltage on the load. So in my example the lamp will get dim even though the first set of batteries is not discharged yet.
Another thing to look out for is that both sets of batteries must be monitored. One set is being charged so we must be sure not to over charge those batteries or they could be damaged. The other set is being discharged and we must monitor this in order to shut down the circuit and swap batteries before they become damaged.
There are other issues which I will cover next time. But I will also share some solutions.
You can watch the video here:
About the Author
| Troy Reid |


