Solar Path Light Hack Make Solar Battery Charger
Make A Solar Battery Charger
Dollar Store Solar Path Light Hack
Here is a simple solar garden light hack. Get four cheap dollar store path lights for this project. Using the original garden light parts, you can make a high speed solar battery charger for AA or AAA batteries. Depending on which model you get (you normally cannot tell from the outside) you will either have AA or AAA batteries and sockets inside the solar path light.

Homemade Solar Battery Charger Using Dollar Store Solar Lamps
Typical Dollar Store Path Light
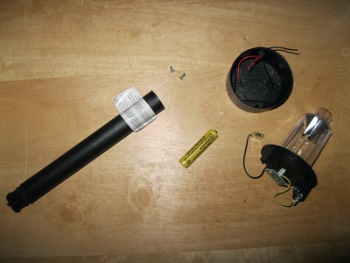
Take apart your solar garden lights. Twist the stem and globe off of the solar cell by giving it a little twist. The solar cell and circuitry pops right off. Use a screw driver and open up the bottom of the unit. Then carefully break off the wires connecting the solar cell to the circuit board. Be careful not to break the wires connecting to the solar cell itself. Then you can remove the screw that holds the little circuit board in place. Cut the wires in half to remove the circuitry from the battery charging socket.
Repeat this process for all four solar path lights. You want to have four solar cells and two battery sockets.
Taking apart a dollar store path light
Find a piece of plywood or other wood to use for the back of your solar charging unit. Refer to the photo below. Line up your solar cells to see how they will fit on the board. Then, using the original bottom part of the unit, mark through the holes in the bottom so you can drill holes into the wood in order to mount your solar cells to the board. Watch the video (bottom of this page) for more details on how this was done.
Find some small screws that will be long enough to pass through your board and into the solar cells. Drill holes in your board as marked. Make the holes just larger in diameter than your screws so they can pass through the board.
Screw the solar panels onto the board. See the photo below.
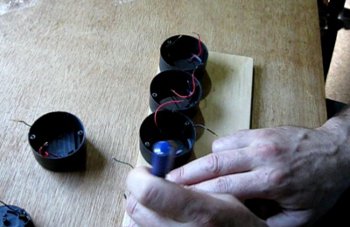
Making solar battery charger
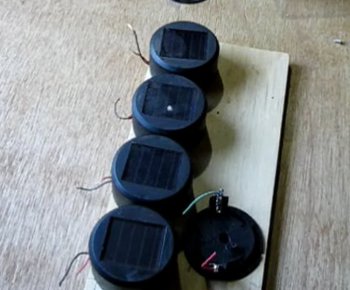
Assembling solar battery charger
Next mount your two battery sockets to the board as well. For the next step you will need some fine insulated wire. Two colors would be preferred. Also get a diode. Any sort of blocking diode or rectifier diode will do. Its only purpose will be to limit the charging current in only one direction to prevent the batteries from discharging back through the solar cells. If a cloud passes over, the batteries can discharge back through the solar cells without a diode. A diode is like a one way switch.
Place the diode in the circuit as shown in the schematic below. Notice the silver colored bar on the bottom. It is important to install the diode in the exact same way.
Attach a piece of wire between every negative lead of the solar cells. Connect them all together in parallel. This means that they will simply all be connected together. Then run a wire form the negative leads of the solar cells to each of the negative ends of the battery sockets.
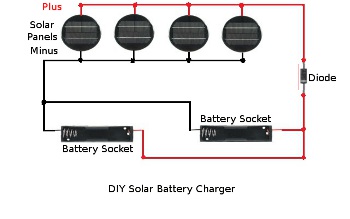
Solar Battery Charger Schematic Diagram
Do the same for all of the positive leads. Make sure you connect the diode between the positive output of the solar cells and the battery sockets. Now solder all of your wires together. (Notice that in the video, the soldering iron is being run off solar energy. Totally green.).
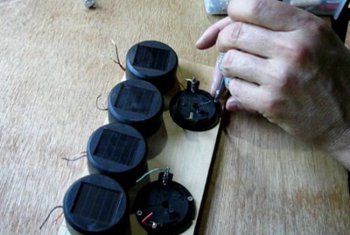
Soldering wires on homemade solar battery charger

Making final connections on homemade solar battery charger
Take a volt meter and make sure that your solar cells are putting out enough voltage in the sun. You should get about 3 volts or so. Anything above 2.5 is fine. Also make sure that your wires are connected correctly to the plus and minus of the battery sockets.
Add a pair of batteries that need to be charged up and check with a volt meter. You should immediately see the voltage drop to the level of the batteries, then start to rise again rapidly. The voltage will rise a bit and then level off as the batteries start to take a charge. At about 1.5 to 1.6 volts (depends on your batteries) you can remove them. They are charged.

Complete DIY homemade solar battery charger working in the sun
You may want to add a small volt meter to your solar charger as well so you can always see the state of charge of your batteries.
See the video here:
 DIY Solar Garden Light Hack - Solar Battery Charger
While you are over there please subscribe to my YouTube channel and follow our daily videos as we strive to become self sufficient and off the grid on a budget.
Feel free to ask any questions or get help with your project on our
About the Author
| Troy Reid |


