
FrankenMiner 2.1 Mining Rig Frame Assembly Instructions
FrankenMiner 2.1 Mining Rig Frame Assembly
Buy yours here:
Package Contents
Please examine the contents before proceeding. If anything was damaged or lost during shipping please content us at troy.thedoityourselfworld@gmail.com
Please refer to diagram 1 for the following:
4 - 20 inch boards
5 – 10.5 inch boards
2 – 10.3/4 inch boards
2 – 6 3/8 inch boards
2 – 3 inch boards
6 – long zip ties
4 – medium zip ties
4 – short zip ties
18 - 1 5/8 inch screws
4 - 2 ½ inch screws
Assembling Your FrankenMiner 2.1 Mining Rig Frame
Please refer to the diagrams when assembling your mining rig frame.
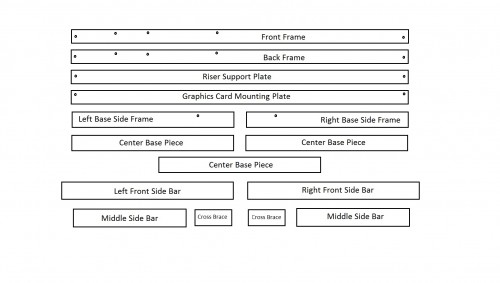
Locate the two 20 inch boards with 7counter sunk holes through them. These are your front and back frame pieces.
Now find the two 10.5 inch side frame pieces. These each have a single hole in them.
Using 1 5/8 inch screws, assemble these pieces together with the recessed part of the screw hole on the bottom and closer to the front of the frame. Refer to diagram 2. Make sure that the holes are positioned like shown in the diagram.
 FrankenMiner 2.1 assembly instructions
Next, take the three center base pieces and screw them in place as shown in the diagram using 1 5/8 inch screws.
Please refer to diagram 3 for the following. Fasten the left and right front side bars onto the base as shown using 2 ½ inch screws through the bottom of the front frame plate. Then fasten the graphics card mounting plate on top using 1 5/8 inch screws. Make sure that the overhang is facing outward and not inward.
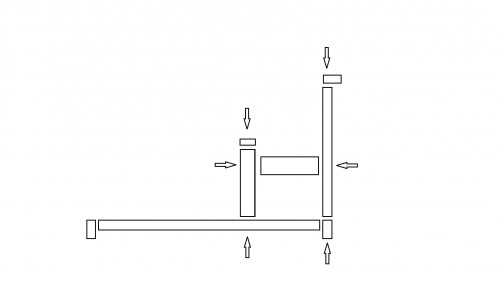 FrankenMiner 2.1 side view assembly
Now fasten the two middle side bars in place with the recessed hole facing back. Use 1 5/8 inch screws. Fasten the riser support plate on top using 1 5/8 inch screws.
Finally, fasten the cross braces into place using 1 5/8 inch screws on the front and 2 ½ inch screws on the back side.
Mounting Mining Rig Onto FrankenMiner 2.1 Frame
Use four of the shorter zip ties to secure the motherboard to the frame. The motherboard goes over the larger opening on the frame. With the graphics card mounting plate facing you the mother board goes on the left side of the frame.
If you are going to mount a graphics card onto the motherboard directly, make sure to leave enough space for the card to pass through.
When securing the motherboard, there is no need to wrench the zip ties too tight. You do not want to put any stress on the motherboard. If the motherboard is secure and does not slide when inserting a USB mouse or keyboard, then it is tight enough.
The power supply goes on the right side along with the hard drive. Use the longer zip ties to secure them in place.
Use the short screws provided to mount your graphics cards to the support rail. This will secure them in place and prevent them from tipping over. It may be easier to mark the holes and insert the screws without the graphics cards first, then removing them, in order to make securing the graphics cards easier. Insert the screws at a bit of an angle into the wood to prevent splinters. Or, optionally, you can use zip ties to secure the graphics cards in place.
The riser support should sit roughly in the center of the riser cards with the graphics cards in stalled.
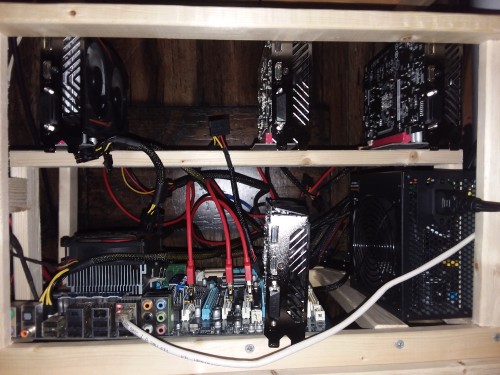
Mining rig installed in FrankenMiner 2.1 frame
FrankenMiner 2.1
www.TheDoItYourselfWorld.com
About the Author
| Troy Reid |


