Make-A-Wood-Stove-Home-Boiler-Heating-System-2
DIY Boiler Home Heating System Continued
Part 2 of the DIY Hot Water Boiler Heating System.
Antique Wood Stove Water Boiler System
If you have just arrived at this page from a search engine, please see page 1, Make the heater radiator and blower box to start at the beginning.
Hook Up The Heater Plumbing
The next part of the project will need some imagination for some people, depending on your wood stove setup. The one used here has a built in water boiler system with water fittings already in place. You can use a normal fireplace as well, but you will need to choose one of a few options for it. We will cover a few ideas below. The diagrams shown are simplified views. For a detailed full explanation of the DIY heating system, please refer back to page one of this article. You can hover your mouse over any of the images below for a larger view.
One plan is to mount a closed metal container full of water to the side or top of your fireplace. The metal tank must be in full contact with the side of your wood stove. As the stove heats up, so will the water in the tank. Attach water fittings to the outside of the tank. The water pump circulates hot water through the home to the radiator system.
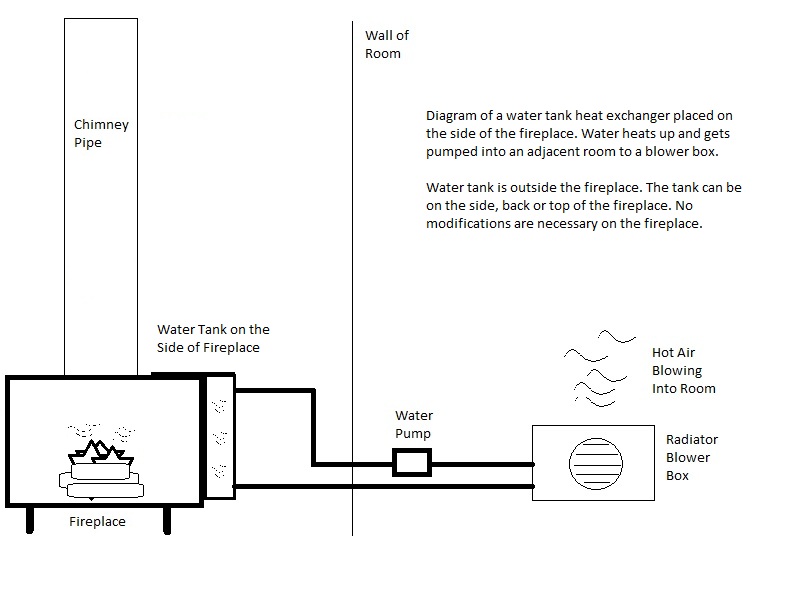
Water Heater Tank On Side Of Fireplace
Another idea is to run copper tubing around the chimney pipe of your fireplace to heat up the water. Use as much copper tubing as you can afford. The more tubing, the more heat that will be transferred into the water. Leave about a foot of copper tubing on the ends to bring it away from the heat source. Attach the copper tubing to PEX tubing, which runs through your home to the radiator.
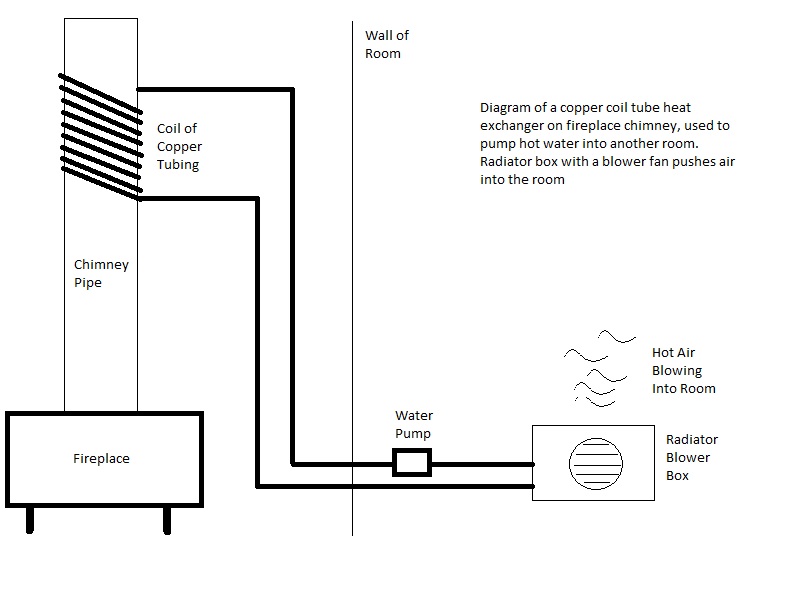
Copper Tubing Heat Exchanger Boiler System
The third option requires a lot more work and money. You can buy a retail fireplace heat exchanger for your fireplace and mount it into the side of of the fireplace. These are made of stainless steel and are expensive. You also need to drill holes through the side of your fireplace to mount the heat exchanger inside. Extend pipe fittings about 18 inches away from the side of the fireplace and attach to PEX tubing for the rest of the system.

Heat Exchanger Inside Fireplace
Either way you go, you should now have a container or tubes that will be full of water and have fittings for your water tubing that will run to the heater blower box.
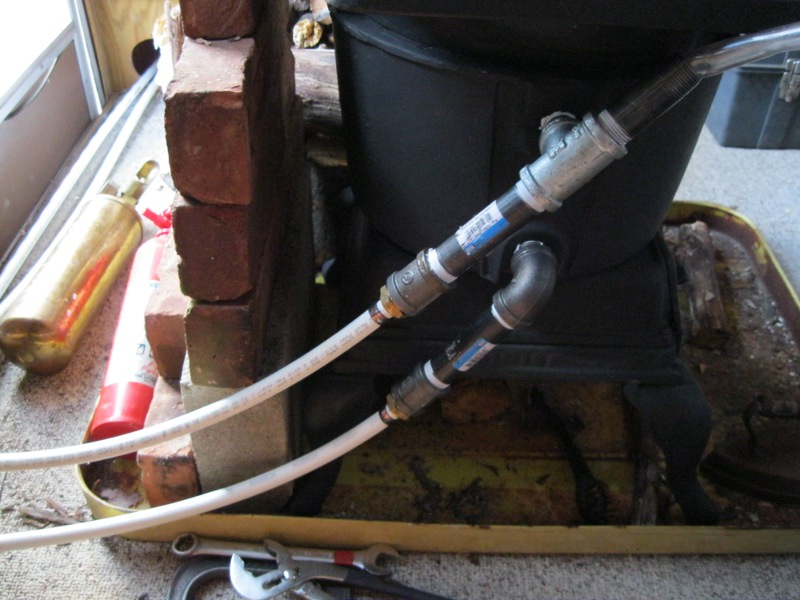
PEX tubing will be used for the rest of the project due to its low cost. If you have copper pipe available, then feel free to use it. But for most people, copper is now way too expensive for normal use. The plumbers recommend using at least 18 inches of steel pipe to bring the PEX tubing away from the fireplace to prevent melting the tubing. The antique wood stove in this example does not get that hot at the sides, so we used a bit less steel pipe.
You will notice that on the top fitting on the wood stove, there is a T adapter with a pipe extending upwards. This is the filler neck to allow water to be poured into the system. You can also just make out the plastic tube that is plugged into it to allow the antifreeze and water mixture to be poured in. After the system is filled and all the air is out of the lines, this will be capped off.
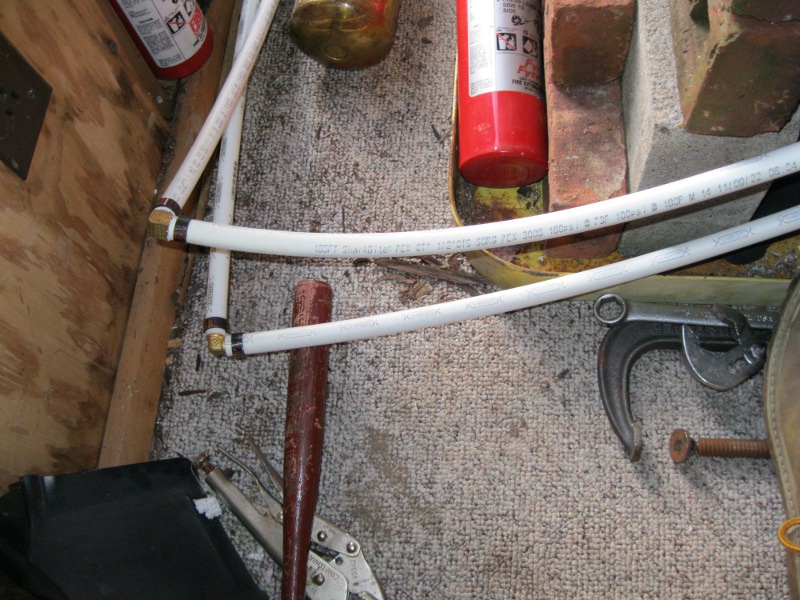
In the second photo you can see the PEX tubing wrench that was used to crimp on the PEX connectors. The PEX connectors require a special wrench to clamp them down properly. Most PEX crimp wrenches are very expensive. The one in the photo was only $20 and requires a ten inch long vise grip to crimp the tubing tightly. Actually, a huge "C" clamp was used on the wrench to torque the fittings tightly enough to prevent leakage. If you have never worked with PEX before, get some advice and study up on it first. There are special crimp fittings and rings required to attach the tubing properly.
Mounting Heater Pipes And Fittings

Crimping PEX Fittings And Connectors
90 Degree PEX Fittings
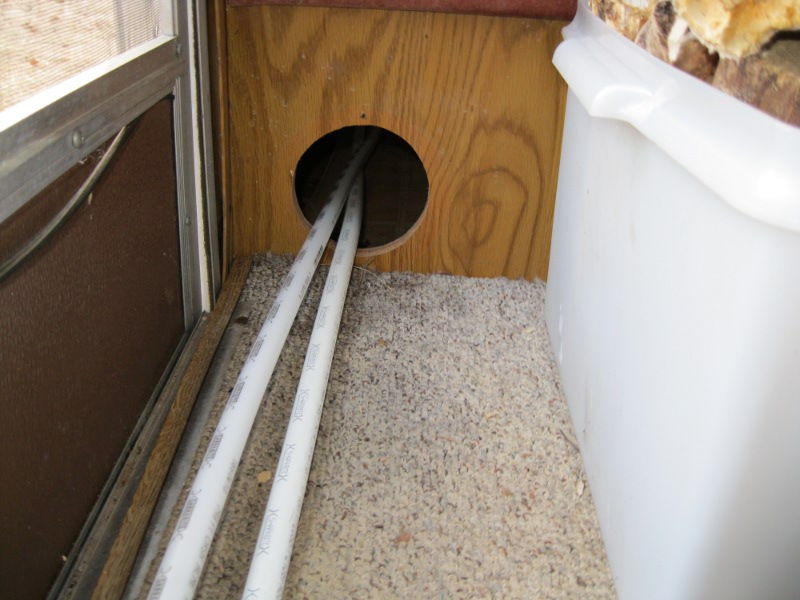
Since the fireplace is now in the living room and the original heating system had a heater duct running through the trailer, under the dining area, and into the living room, this was a convenient place to run the tubes through. The original duct and vents were removed and the PEX tubes were run through the passage into the heater blower area. In this case, all of the plumbing ran underneath the dining room bench seat. Your setup will vary and most of the plumbing will probably be installed into the original heater area. The first photo shows the PEX tubing running underneath the dining room area. It will later be covered with a floor cable protector. You can also run the tubing underneth the floor, but need to insulate the tubes to prevent heat loss.
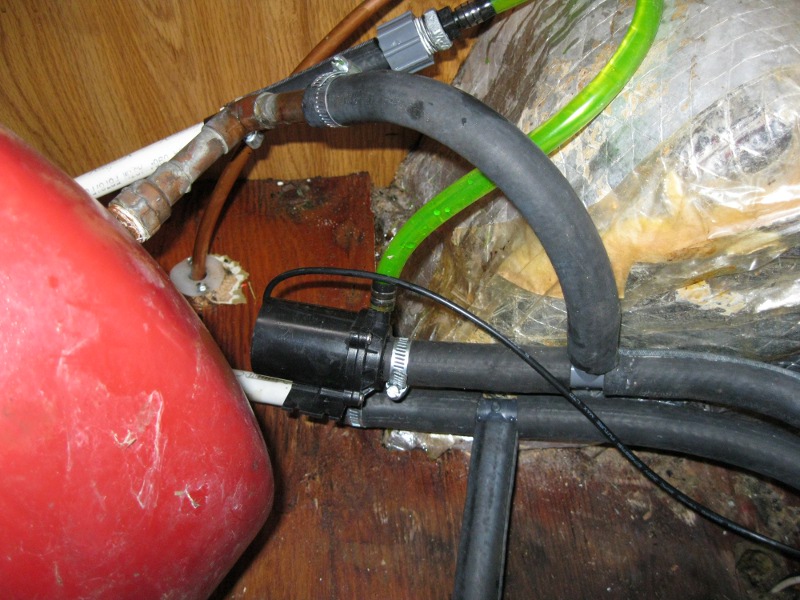
The second photo shows the completed plumbing. The large red tank is an expansion tank that was salvaged for free. If you need to purchase one, they are only about $35 new. The expansion tank will allow the heated water to expand without danger of explosion. As the water gets hot, it expands. In a fully closed system, this would lead to an explosion and dangerous shrapnel and boiling water being blasted all over. The expansion tank has a rubber diaphragm on one side and an air chamber on the other. As the water expands, it pushes into the chamber, compressing the air on the other side. When the water cools, it is pushed back into the pipes.
In the same photo, off to the right side of the image, you can see the black hoses running to the copper pipes of the heater core. Car heater hoses were used to interface between the PEX tubing to the car heater core. Some adapters had to be used to scale the tube size from 1/2 inch PEX up to 5/8 inch for the heater core fittings. You can see the water pump in the middle, also with adapters. The water pump came with a small 3/8 inch fitting on the output side, so it had to be scaled up to 5/8 inch in order to install it into the system. The third photo shows a closeup of the water pump.
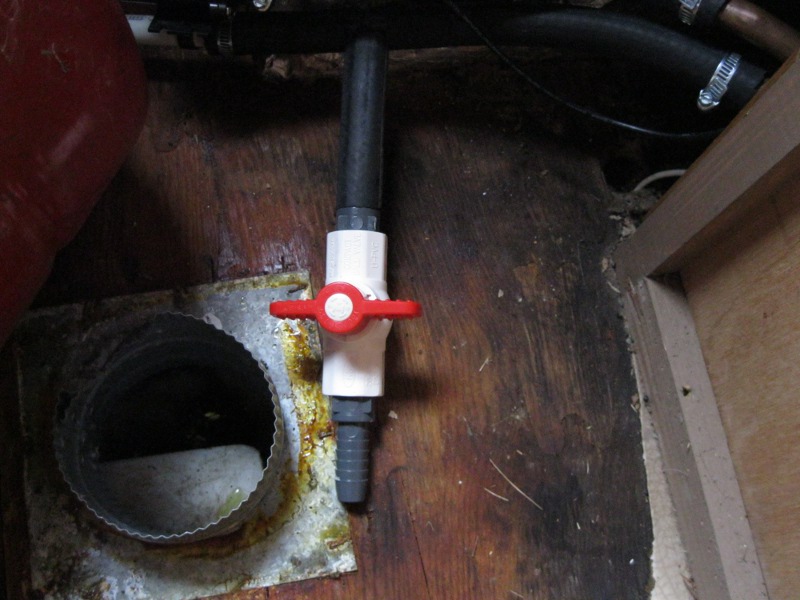
The last photo shows a closeup of the drain valve. This was installed in case we need to empty the system for cleaning or to change out the water. Automotive antifreeze can get corrosive with time, so it is a good idea to replace it at the beginning of each season.
Hot Water Tubes Running Through Home
Closeup Of Heating System Plumbing
Heating System Water Circulation Pump
Heater Water Drain Valve
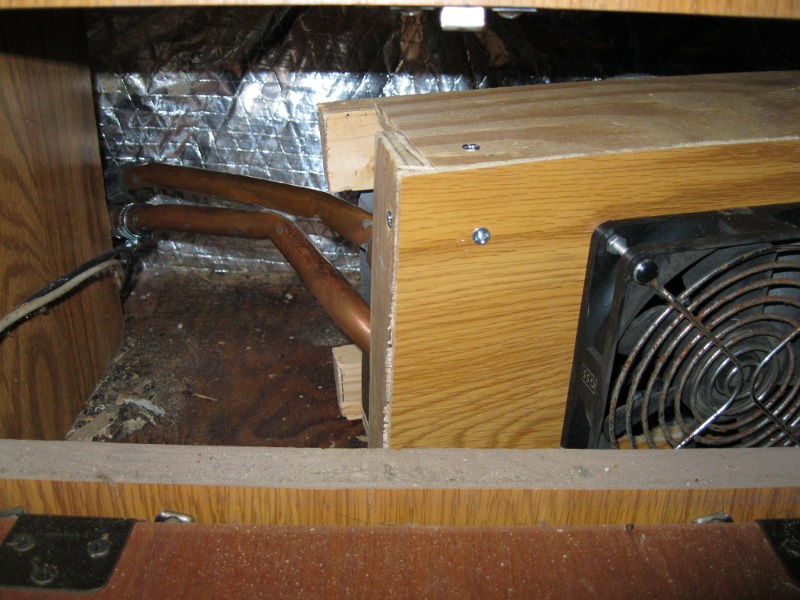
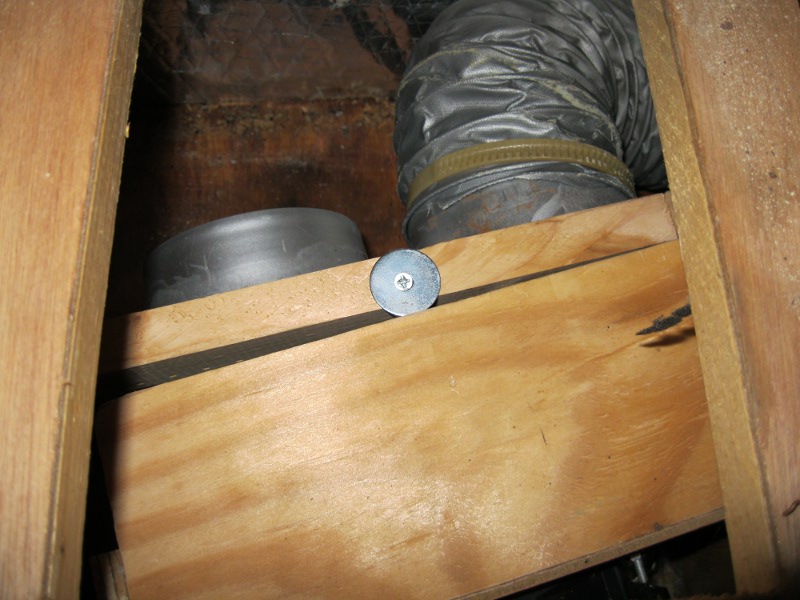
The first photo below shows the homemade heater core / radiator box with the heater blower fan attached to it. The next image shows the heater duct going off to the right side, which blows hot air into the bathroom. The one on the left has not been attached yet. You can also see that the box is not yet fastened closed in this photo. It has been left open to check for water leaks for a few days before closing it all up tight. You should closely monitor the whole system for a while to ensure that there are no leaks. In our own example, two of the PEX lines had to be recrimped due to a small leak at the joints.
Heater Core Blower Box
View of Heating Ducts
The heater blower and the water pump were simply connected to power with a toggle switch. When the wood stove is fired up, you will need to flip the switch to turn on the pump and the fan. You can set up a thermostat controlled fan switch to turn on the heater blower fan when the radiator core gets to a certain temperature to prevent blowing cold air through the trailer.
A schematic is below. Use any standard NPN transistor for Q1. R1 is a thermal resistor, which gets placed against the surface of the heater core. Use long wires to attach it to the circuit. When the thermal resistor heats up, its resistance decreases, allowing the transistor Q1 to turn on. Q1 then turns on Q2, the power transistor. Use any suitable transistor for Q2, which can handle the current of your blower fan. Put a diode across the leads of the fan to protect the power transistor (not in schematic). The 10 K POT allows you to fine tune the turn on temperature of your circuit. It may take a while to fine tune it to your satisfaction.
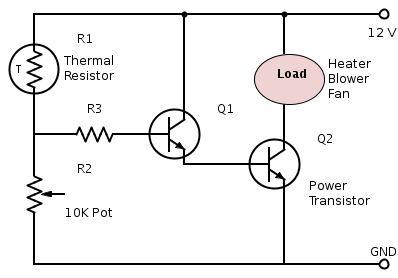
DIY Automatic Thermal Heater Blower Switch
Results with this homemade boiler heating system were quite impressive. The amount of hot air flowing out the heater vents is about equal the the amount an original propane furnace puts out. Feeling hot air blowing through the vents was quite a satisfying fact. The heater core gets quite warm after a few minutes, so we will later install a second fan to get more heat out of the system. The fireplace heats up the water very fast and within about ten minutes, you can feel hot air blowing through the trailer.
Feel free to ask any questions or get help with your project on our
About the Author
| Troy Reid |

