
How To Make A Joule thief And Use Dead Flashlight Batteries
I show you how to make a very simple circuit called a Joule Thief which can use a dead flashlight battery to power LEDs and other devices.
This circuit contains only a few components but performs an amazing act of drawing power from a dead flashlight battery long after it has been considered useless for normal devices. This particular circuit can use a battery down to 0.37 volts while powering a white LED light.
To make a Joule Thief all you need are the following parts:
Parts List
1 K Ohm resistor 1/4 watt
2N2222 or other NPN transistor
Toriod form
White LED
Insulated wire 30 to 34 gauge
Battery holder
Dead AA or AAA battery
NOTE: I am putting together some Joule Thief circuits in kit form. Check back here in a few days. I plan to sell the kits for DIY soldering and as a fully assembled unit for those who do not want to solder. I will update this page when the parts arrive.
Here is the circuit we are going to build:
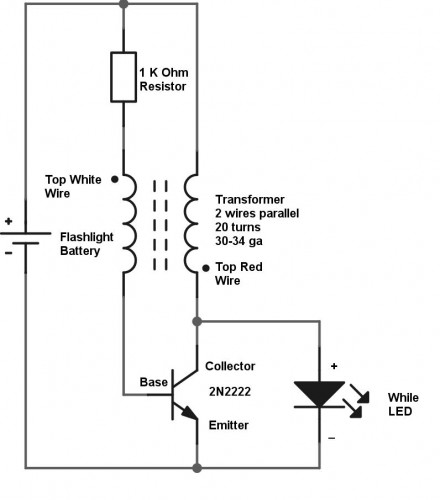
Joule Thief Circuit
You can assemble this on an experimenters breadboard if you like or you can solder the components directly together. I show you both ways in the video. You can find the link to the video at the end of this article.
I am using an AA flashlight battery but this will work with AAA batteries as well. Just remember that the larger the battery, the longer it will last while powering this circuit.
Assemble Joule Thief
To make a Joule Thief first get a toroid form which is a round donut shaped form. You will need two different colored wires. These can be insulated or magnet wire and about 30 to 34 gauge.
Take the two wires and wrap them together at the same time around the form until you have about 20 turns. The wires must be wrapped together side by side at the same time.
Strip off the four ends of the wires. You should start the wire on the bottom of the donut form as you look at it sitting on the table and end the coil on the top of the form. This will make it easier for you to proceed with wiring the circuit.
Now for the purpose of this project I will label them white and red. You may have different colored wires. It does not matter as long as you follow along with the circuit. The top wire is marked with a dot on the diagram.
Start out with your resistor. Connect the bottom end of the red wire of the transformer to one end of the resistor. Also connect a red wire from the positive (plus) battery holder terminal to the same point on the resistor.
Next connect the other end of the resistor to the top white wire of the transformer.
Here is the pinout diagram of a common 2N2222 transistor:
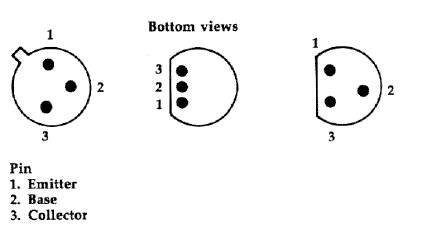
2N2222 Transistor Pinout Diagram
Now connect the bottom white wire of the toroid coil to the Base pin of the transistor. You can refer to the diagram above for reference. The most common types are shown above. The Base in the circuit diagram is the middle pin with a straight vertical line.
Next connect the top red wire of the transformer to the Collector of the transistor. This is the topmost pin in the circuit diagram.
Connect a black wire from the negative (minus) terminal of the battery holder to the last leg of the transistor, the Emitter. This is the side with the arrow pointing outward on the circuit diagram.
And finally, the last point is to connect the LED across the Collector and Emitter of the transistor.
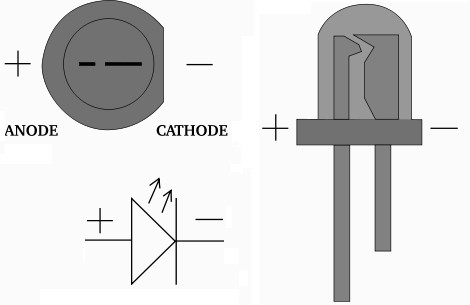 LED pinout diagram
An LED has one leg longer than the other. an LED also has a notch cut out on one side of the case like a transisor often does. The longer leg is positive and the shorter leg is the negative.
On the circuit diagram the negative lead is marked with the long slash with the arrow form pointing at it.
Connect the LED Plus side on the Collector of the transistor and the Negative pin to the Emitter of the transistor.
Now put a dead battery in your battery holder and you should have light.
Troubleshooting
If your circuit does not work right away dont panic. There are a few things you can check.
Make sure the transistor is connected properly. This is a common area to make a mistake in identifying the pins.
Make sure the LED is put in the right way. Try turning it around and see what happens.
Make sure that you have the top and bottom coil wires connected properly. This makes a difference how they are connected.
Try a different battery. This is less likely but sometimes a battery is really, really dead.
If all else fails, try replacing the transisor, LED, resistor and battery holder. Sometimes even a brand new part can fail or be defective off the shelf.
Have fun. Now you have a night light that uses old batteries otherwise considered garbage. Stay tuned for future ideas and uses for the Joule Thief circuit.
You can watch today's video here: How To Make A Joule Thief To Use Dead AA Batteries
While you are over there please subscribe to my YouTube channel and follow my projects and experiments in alternate energy and electronics.
About the Author
| Troy Reid |


