
How To Wire Up Solar Charge Controllers
I am taking my new work shop off the grid this week. The first step is to get my solar charge controllers, batteries and solar panels hooked up. Today I show you how to wire up your solar charge controller.
Most solar charge controllers have three sets of connections. There is a battery input. A solar panel input. And a power output. Each set has two wire connections - a plus and a minus connection.
For today we will ignore the power output. I never use these since they have a lower power capacity and are only intended to shut off the power output when the battery voltage gets too low. I monitor my battery banks myself and shut down my power use as needed. Most of your power needs will be too large for this small output anyway.
The first thing you want to connect are the battery wires. ALWAYS connect power to the solar charge controller first. Never connect the solar panels to a solar charge controller without first having power applied from the battery bank. This will prevent damage to your solar charge controller. When removing a solar charge controller always remove the solar panels first and then remove power to the solar charge controller.
Find the battery connections on your solar charge controller. Most have a small battery icon next to the terminals. If yours does not then please refer to the owners manual to be sure.
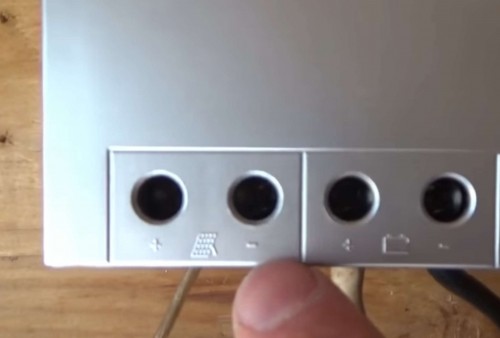 The battery connections are generally shown using a battery icon (right side)
Use thick, heavy gauge wires and a short run between the solar charge controller and the battery bank. This will reduce loss in the lines.
There are two connections held in place with screws. They are labeled with a plus (+) sign and a minus (-) sign. The plus is for the positive terminal of the battery bank and the minus goes to the negative terminal of the battery bank.
There are many arguements about which goes first, plus or minus. I have never seen any problems either way and am not going into this discussion today.
Connect a red battery cable to the positive terminal of your battery bank and then connect it to the solar charge controller plus terminal. Then connect a black battery cable to the negative (-) terminal of the battery bank and then to the negative terminal of your solar charge controller. Tighten the screws down firmly.
Now you should see a battery status indicator. Depending on the model of your solar charge controller this could be an LED light or a digital voltage display. Either way make sure that your solar charge controller has power at this time.
Next you can connect the wires from your solar panels to the solar charge controller. I will save solar panel wiring for a separate video. There are different ways that you can connect your solar panels together in order to increase overall solar power output. But for simplicity today I will save that for later and assume you have a single solar panel.
You will have two wires. They will be either red and black or be labeled with a + and a - symbol. Remember + is positive and - is negative.
Find the connectors with a little solar panel icon next to it. Most solar charge controllers have a small solar panel icon. Yours may vary so refer to the owners manual to be sure. Connect the positive terminal to the + connector on your solar charge controller. Next connect the negative wire to the - connector on your solar charge controller. Again tighten the screws firmly onto the wires, holding them in place.
 The solar panel connections should be indicated by a solar panel icon (left side here)
Now, if the sun is shinging, you should see a led or other indicator showing that power is coming into the solar charge controller from the solar panels. This is very good. Now you are finished installing your solar charge controller.
If you do not have a light or other indicator of charging from the solar panels then check all the wires between the solar panels and your solar charge controller.
I use a volt meter to check solar panels but this will be a separate video.
Now you have taken the first step to off grid living.
You can watch today's video here: How To Connect Solar Charge Controller ~ Setting Up Off Grid Solar
While you are over there please subscribe to my YouTube channel and follow our daily videos as we strive to become self sufficient and off the grid on a budget.
About the Author
| Troy Reid |


