
Assembling The Q3 Charge Accelerator Toroidal Section
I am assembling the Quanta Magnetics Q3 Charge Accelerator toroidal section. This is the third and final section of the three stage pulse motor generator. I have the pulse motor and energizer section running already.
I have been running experiments on the pulse motor and generator section of the Quanta Q3 charge accelerator for about a week now as I was building it. I first had the pulse motor section working and was experimenting with charging batteries using the pulsed output.
Then I built the energizer/generator section and got that running recently. This too has been connected to batteries to see how it charges.
Our off grid tiny house on wheels has been loaded up with electronics and tools for a while now and it is time for me to clean up and let Melanie have her dining room table again. She has been very patient with me but I do not want to push it.
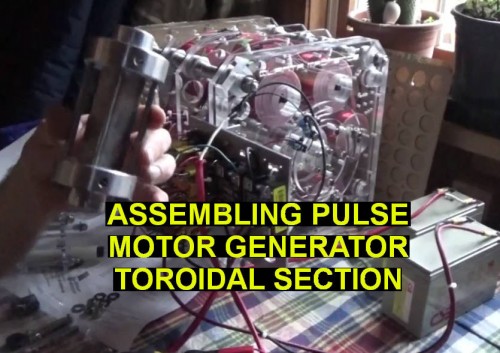
I am building the final stage of the Charge Accelerator, the toroidal section. This is the third and final part of the three piece Charge Accelerator. There will be three separate charging outputs. You can charge three different batteries or combine all three outputs to one battery or battery bank.
 Assembling The Pulse Motor/Generator Toroidal Section
I have been experimenting with the timing of the Quanta Q3 Charge Accelerator as well. You can adjust the timing in many different ways to get different results on the input current, motor speed and charging output. There is a sweet spot for both the energizer and the pulse motor sections. I just have to find it.
I put on some rubber work gloves to protect the acrylic from my fingerprints and oils as I worked. Then I assembled the toroid section of the motor/generator. This required that I removed the front bearing plate as wel in order to attach the bolts.
I had to press in the two nylon nuts to get them recessed far enough for the bolts to go through. As I work more with this machine the more I realize how precisely and finely this device is manufactured. There are so many specially made parts and they all fit together perfectly. It is quite amazing really.
Finally I put the hub assembly together. This just consists of a piece of square tube steel, two hubs and a few bolts. This assembly slides onto the front of the motor shaft. This will later hold the N42 neo magnets when I get them.
You can watch today's video here: Assembling The Quanta Magnetics Q3 Toroidal Section
While you are over there please subscribe to my YouTube channel and follow our daily videos as we strive to become self sufficient and off the grid on a budget.
About the Author
| Troy Reid |


