
Soldering The Wires On Charge Accelerator Stator Half
I picked up some 18 gauge wire and started to solder the wires on the stator half of the Q3 charge accelerator. I want this to look very nice so I am taking my time doing the work.
First I ran the coil wires through the little holes in the stator half so that the wires can run along the back side of the coil sets. Then I cut the coil wires shorter and soldered an 18 gauge wire onto each of the coil wires.
I was going to use a cigarette lighter to burn off the insulating enamel from each coil wire but ended up using a knife to scrape it off instead. When scraping the enamel off magnet wire you must be sure to get it off all the way around the wire. This is an insulator and will prevent proper conduction of electricity if you dont get it off well enough. It can also prevent you from getting a proper solder connection.
I used a black wire for the inside coil wire and I used a red wire for the outside coil wire. This will help me identify the coils easier when connecting them to the bridge rectifier diode sets.
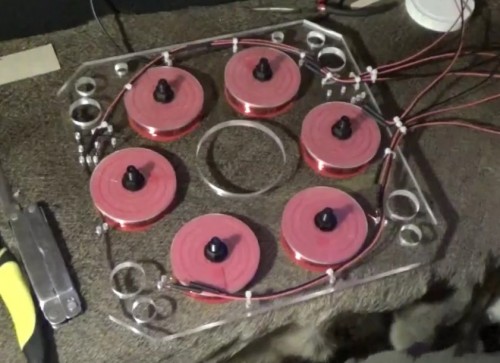
 Soldering wires onto coils on the motor stator
When soldering, make sure that you have a damp sponge or paper towel on hand to help clean the soldering iron tip in between each solder joint. It often helps to clean the tip before and after each joint so ensure that the tip is clean and the heat can be easily transferred into the wires.
Hold the soldering iron up against the wires and then touch the solder to the iron close to the wire until the solder melts. Then hold the solder against the wire for a second until it flows all around the two wires you are joining together. The solder will be a liquid at this time and flow neatly around the wires. Remove both the soldering iron and the solder at this time. Wait a few seconds for the solder to cool before disturbing the new solder joint.
You can see a video demonstration I once made on how to solder here: How to solder electronics components - video for beginners
Notice that when I am soldering I place a piece of scrap paper or cardboard underneath the solder joint so that if any solder drips down it will not touch the acrylic stator frame and leave a mark on it. I also work neatly and have a trash can next to me when I solder. In this way I can immediately thow away any wire insulation or solder droppings as I work.
I used plastic zip ties to hold the wires down neatly to the stator assembly plate and routed them around the outside of the coils.
When cutting the long wires that I just soldered onto the stator assembly I left about six inches in length past the stator plate so that I can work with the wires easier later on.
 Finished soldering the wires on one motor stator half
I realized partway into this project that I miscalculated when buying the wire at Radio Shack. I dont think I will have enough wire to complete the motor assembly of the Q3 charge accelerator. I will have to go back and get some more wire in order to get the motor running properly.
You can watch the video of today's work here: Soldering Wires On Charge Accelerator Stator Half
While you are over there please subscribe to my YouTube channel and follow our daily videos as we strive to become self sufficient and off the grid on a budget.
About the Author
| Troy Reid |


