Wind Turbine And Generator Construction Details And Facts
Wind Generator Design
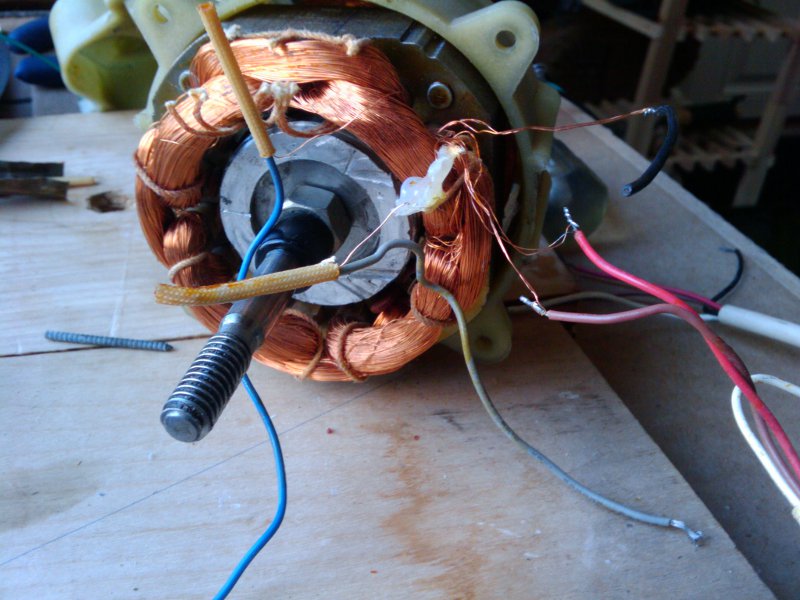
Wind Turbine And Generator Winding Basics
Regardless if you are going to convert an existing motor into a windmill or generator - or you will be making a generator from scratch, you will need to decide which type of windings you want to make. There are a couple choices for generator design. There is the single phase generator, which is simple to make, but has its drawbacks. And there is the multi-phase, or three phase generator design, which is more complicated to make, but has advantages.
You can convert a normal motor into a windmill (See Article) with very little modifications and have good results. But, if you wire it properly, you can see an incredible increase in power output. A DC motor will generate electricity with no change at all. Simply spin it up and it produces power. We will be discussing AC generators, also known as alternators. An alternator produces AC, alternating current. During one cycle, one of the wires is positive while the other is negative. On the next cycle, the poles are reversed. This is alternating current. The cycle goes back and forth. You will need to rectify (convert) the AC into DC in order to charge batteries, which we will cover later.
A very important point when making your windmill or generator is that you should get the most powerful magnets that you can afford for the project. These are the powerhouse of your generator. The stronger the magnets, the more power your generator will produce. Your magnets should be sized to completely cover the coil as it passes by. You want the largest amount of magnetic flux to be cut with each passing coil. If you have one inch long magnets, then make your coils just slightly larger so the ends of the coil loops just stick outside the top and bottom edge of the magnet.
Two other things influence your power output. Speed and distance between the magnets and the coils. The faster the generator turns, the more power is put out. And the closer you can get your magnets to your coils without actually touching, the more power you will get out. There are a lot of other variables, such as the number of turns in each coil and the wire size, but that gets very complicated. Maybe a topic for another day.
Identify Your Magnet North Pole
To identify your magnets' north and south poles, use a compass and hold it near one side of a magnet. Opposites attract, so the compass should point to the south side of the magnet. The actual "North" pole of the earth is really magnetic south. So, the pointer of a compass is a magnetic north. Your compass then, will point to the south pole of a magnet.
Another idea, if you do not have a compass available, is to attach your magnet to a piece of string and let it settle until it stops spinning. The north pole of the magnet will be pointing to the "North" pole of the earth. You can also float the magnet in a glass of water on top of a piece of styrofoam or wood. Wait until it settles. When it is done moving, the magnets' north pole will be pointing to the North.
Label your magnets with a permanent marker.
Single Phase Generator Design
A series wound, single phase generator is the easiest to make. But it has more cogging at lower wind speeds and more vibration than a three phase generator design. This means it will not start up as easily in lower wind speeds, buts its simplicity makes it a very common DIY windmill design.
For a single phase generator, you use the same number of magnets as coils. If you have 8 coils, then you will use 8 magnets. Use alternating north and south poles when placing your magnets on the rotor. See image below.
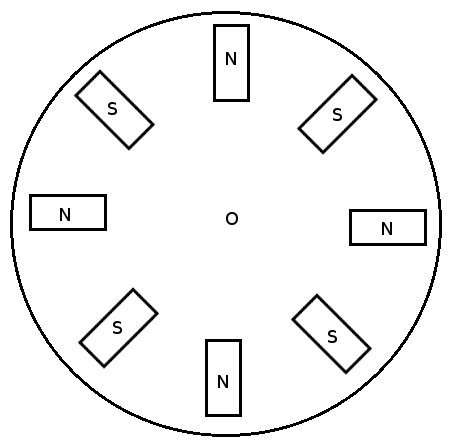
When you make your coils on a coil winding form, wind them all in the same direction. For example, wind them all clockwise in direction. Make a kink or a loop in the starting end of the wire to mark it. This will help you wire your coils together later. Start each coil on the same side of the form and finish each coil the same as the last. Each coil should be exactly alike.
When you place the coils on the stator, be sure to position every coil in exactly the same position as the last. For example, have the positive marked wire (with the loop on the end) on top when you put in in place.
After you have your coils made and placed onto your stator, you can refer to the diagram below for wiring the coils together.
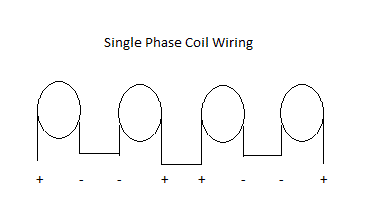
The image above shows a simple coil wiring diagram. The coils are wired in a single phase format. The longer wires (the ones you left a loop in), we will call positive and the shorter ones we can call negative. Connect the negative of the first coil to the negative of the second coil. Then connect the positive of the second coil to the positive of the third coil and so on. You may have 4, 8, 16 coils or any other number of coils. Regardless how many coils you have, the wiring for a single phase generator is as shown above.
Three Phase Generator Windings
Three phase generators have better low wind start up and less cogging. They also offer the advantage of a smoother output due to the staggered phases of your coils. At nearly any time during the rotation of your rotor, the coils are producing electricity. See the image below for reference. The three sets of coils are offset from each other a little.
When you make the coils, refer to the instructions above for making coils for a single phase generator. You will wind them all the same way and mark them with a loop to identify them later when wiring them all together. Refer to the image below to get an understanding of a 3 phase coil setup.
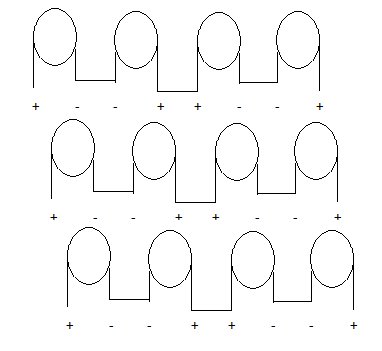
If you decide to make a three phase generator, then you have two more choices. You can wire the coils in either a star or delta pattern (see below). The version you choose to make depends on the average wind speeds in your area. If you have lower wind speeds, the you should consider the star windings for better low speed power generation. If you have higher average wind speeds, then go with the delta pattern for more high speed power output.
Three phase generators can get very complicated in the amount of choices you have in regards to how many magnets and coils to use. But a general guideline is to use 3 coils to every 4 magnets (for one phase). So, if you have 6 coils per phase, you would have 8 magnets. If you have 9 coils per phase, then use 12 magnets. Again, here you can get very complex designs and you may find a lot of varying opinions about what configuration is better.
Three phase windings also allow you to have a lot more coils per magnet, therefore putting out a lot more power than in single phase units.
Star Generator Configuration
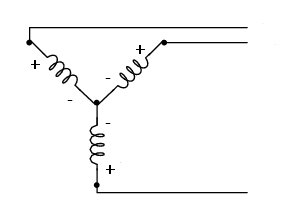
A star configuration provides more voltage, but lower current. Due to their higher voltage, star configurations provide better low wind power generation. They start to charge the batteries sooner, at lower wind speeds.
In the star configuration each of the "negative" wires will be connected together in the center while all the "positive" wires will be the output leads. See the image below. You can attach each lead to a normal bridge rectifier in order to get DC voltage out.
Delta Generator Configuration
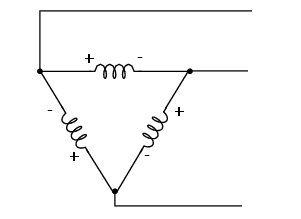
Delta windings provide more current, but lower voltage. The delta configuration provides higher overall energy output, but little or no output in low wind situations.
In the delta configuration, you would connect the positive lead of one coil to the negative of the next and so on. See the image below for details. Again, you can use a normal bridge rectifier on each output lead to get DC voltage out.
DIY Generator Summary
You can even combine the star and delta configurations for even better performance at all wind speeds. You would need a switching device to switch between the two based on voltage and wind speed. At lower wind speeds, you would start out with the star pattern to get better low wind start up and higher voltage and start charging batteries sooner. After a certain wind speed, you would switch to the delta pattern in order to get better overall power output.
Feel free to ask any questions or get help with your project on our Support Forum.
About the Author
| Troy Reid |


